Starting with PHP
Web pages are normally created using HTML codes. However pages created with pure HTML do not change and remain static unless we edit the HTML code manually. If the pages are served to the internet using a web server, you will need to upload the changed files every time. However, static web pages are of limited interest nowadays. People want to see personalized web pages, pages which provide information which is updated frequently and they want to interact with the pages.
In order to have dynamic web pages which change each time a visitor browses them, we need to use a programming language which can produce html pages on the fly or at the moment the visitor requests the page. In this way, the page can be created with the latest information stored in a database, allow creating personalized pages for each user and enhancing the user experience by providing an interactive website.
An example of dynamic web page is Yahoo’s Webmail or Google’s search. Every time you login into your webmail account you see a different page (which obviously has a different html code). When you receive new emails, the page will change to show the updated mail box. This dynamic web page creation happens the moment you browse the page. A program runs every time, searches for your emails on its database and creates an html page on the fly. The software which is used for this purpose is located on the server side (not on the client browser side). Therefore we call these pages “server side dynamic pages”.
Several programming languages are available for this purpose. A few of these programming languages and technologies are: PHP, Java, ASP, ASP.NET and Perl. Some of these languages were initially developed for either UNIX (including Linux) or Windows type servers. However nowadays they are available on both platforms.
If you want to develop a software for your WebPages using a specific language or technology you should check with your hosting company to see if the language and technology is supported on their servers or not.
In contrast to server side web programming languages, there are browser side programming languages. With client side dynamic pages, a program is embedded in the html page in the form of a script. The software runs on the browser and changes to the web page are performed. Interactions with the program are made immediately on the browser. Everything happens instantly because program is available on your browser.
With server side pages, pages are created in server and data is stored on server. Creating dynamic web pages in the server side will take more time because the request needs to travel over the internet in order to be processed. The resulting page also needs time to be transferred to the browser.
Even though client side techniques are faster, using server side dynamic pages are sometimes inevitable. For example, user database of a website, emails of users in a email service provider like Yahoo, news entries and similar things need to be stored on a centralized location on the server. Creating dynamic pages with that data is therefore done in server side.
Preparing a Server
A web server needs different software pieces to host a website. A web page serving software like “Apache web server” or “Microsoft IIS” is the core software. In addition to web server software, PHP programming language software package needs to be installed on the server computer. If you are going to use databases to store data, you will also need to install a database server on the server computer (or sometimes on another machine on the network). In this course we will use MySQL database server which is a free and open source database engine.
You will need to download and install each of the above mentioned software in order to have a fully functional server. Alternatively you might download and install one of the pre-configured packages which contain these components and other useful software as a single download. Examples of such packages are XAMPP and WAMP. In this course we will use XAMPP which is maintained more actively. In addition XAMPP is available for Linux, Mac and Windows which covers a wider audience.
In order to download the XAMPP package for Windows operating system you visit “Apache Friends” website at http://www.apachefriends.org and go to XAMPP section. You can then download either .exe or .zip version of the server. The .exe version of the server is easier to install because it is a self extracting compressed package. The file should have a name like “xampp-win32-1.7.3.exe”
After you have downloaded the .exe package double click on it to run the auto extract package.

Figure 1.1: Running the XAMPP installation archive.
Package will be extracted on the drive name and path you identify. In “Windows 7” you are not allowed by default to extract the software directory on the root of drive C (the drive in which windows has been installed). You may want to select another drive in that case or extract the software in “Program Files” directory.
After the archive package is extracted, a script will be run which performs final installation configurations. You can simply accept default answers asked by the script in this step (Figure 1.2).
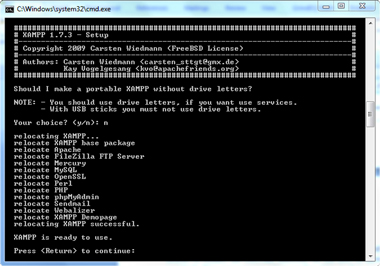
Figure 1.2: Running the XAMPP installation archive.
A shortcut to XAMPP server will also be put on your desktop and you can run the control panel of the server by clicking on it (Figure 1.3).
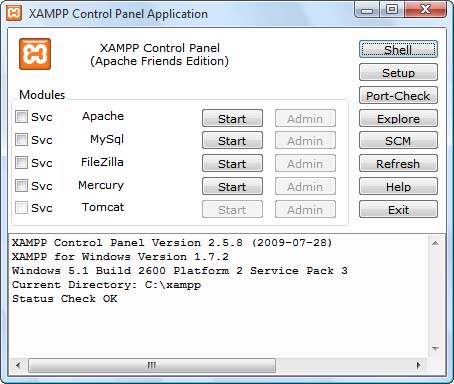
Figure 1.3: Running the XAMPP control panel.
After the control panel is run you can start the Apache web server by clicking the “start” button in front of the “Apache” entry (Figure 1.3 above). You can also force the “Apache” to auto-start by putting a tick mark behind the “Apache” entry (svc or service tick box). In this way, the web server will start automatically when Windows come up every time. You may do the same for MySQL database server. The other services provided by XAMPP are not used in this book and you do not need to start them.
After starting the Apache web server you can test the installation by browsing http://localhost/ or http://127.0.0.1/ . If a web page similar to below one (Figure 1.4) appears on your browser, your installation has been successful.
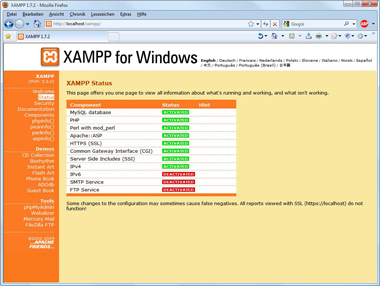
Figure 1.4: Browsing the default webpage of web server.
How PHP works
As described earlier, when you browse a dynamic page on the internet, your request is being sent to the server. Server is a normal computer (like your own PC, perhaps with a bit higher reliability and a little more powerful) which is connected to a high bandwidth internet. On the server computer, “web server software” gets your request and looks at it. If your browser has requested a normal static HTML or image file, it will read the file from hard disk and deliver it to your browser over the network without any kind of processing of the contents of the file. If the web server finds that a request belongs to a PHP file, it starts by reading the file. Web server then runs the PHP scripts which are embedded in html code, replaces the scripts with the execution results (which are normally HTML code themselves) and builds an HTML file. The HTML file which is created at that moment (on the fly) is sent to the browser over the internet.
First PHP Page
For this course you may use simple text editor to write html and PHP codes. Notepad++, Programmer's Notepad, jEdit, EditPlus, UltraEdit and many other simple editors are good candidates for this purpose. Notepad++ and Programmer's Notepad are free and open source and therefore we prefer them. You can also use professional PHP development environments (IDEs) like Netbeans, Eclipse, Zend Studio, Aptana but using these IDEs needs more initial effort and learning. You will however benefit from their features in big projects. These features include debugging, code completion, code refactoring. We will have a chapter on Netbeans IDE later in this book which will help you start using it for your projects.
For our first example, we start with a very simple PHP example. The example will use the “echo” command to print a simple text. Create a file type the following code. You may want to use the filenames suggested above the examples or any other name with .php extension. However keeping the name we suggest might help you track the examples easier.
Example 1-1: example1-1.php
<html>
<head>
<title>Example 1-1, PHP Sample Program</title>
</head>
<body>
<?php
echo "Hello World! from PHP code!";
?>
</body>
</html>
Now save the text as "page11.html". Notepad by default will add a “.txt” extension to every file it saves. To make sure it will save your file with an “.html” extension you need to change “Save as type” setting in “Save file” window to “All files” (Figure 1.1).
Running your PHP pages
In order to see the output for normal HTML files you could open them directly with the browser. However PHP files need to be run on a web server in order to be viewed on a browser. For this purpose, you need to put your PHP files in web server’s web directory and use the browser to connect to the web server over the local or internet network.
If you have installed XAMPP in previous steps, you now have a ready web server to run your PHP pages. If you selected drive D for the installation for example, there should be a “xampp” directory on your drive D. Apache web server coming with XAMPP expects you to put your web files in the “htdocs” sub directory under XAMPP installation directory. In our case this directory is “D:\xampp\htdocs”. You may put your “example1-1.php” file into this directory or build another subdirectory under “htdocs” (like “lesson1”) and put the file inside it. Now assuming the webserver is running, browse http://localhost/example1-1.php or http://127.0.0.1/example1-1.php web address in your browser. You should see the resulting page in your browser if everything has been done correctly (Figure 1-5). If you have put your file inside a subdirectory like “lesson 1” you need to add the subdirectory to your web address and browse http://localhost/lesson1/example1-1.php instead.
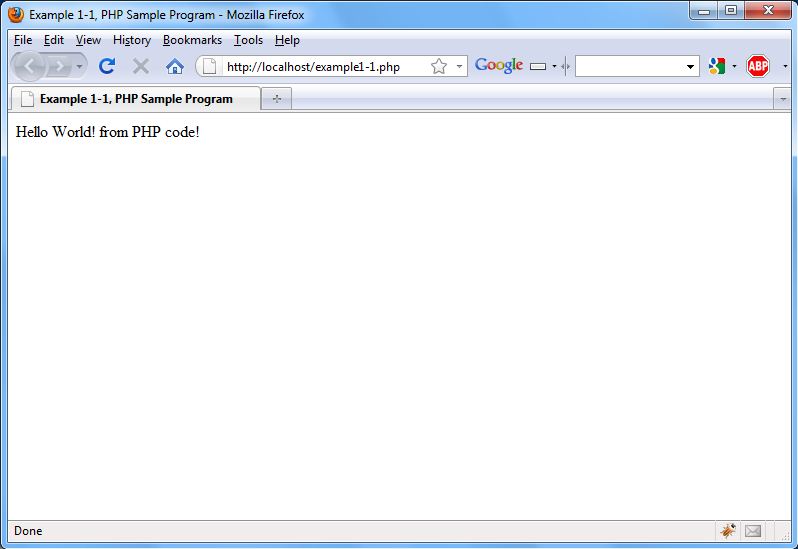
Figure 1.5: Running the first example PHP page
PHP File Structure
You have for sure noticed the PHP script section in previous example. As you saw, PHP scripts are surrounded by <?php …?> tags. In our example “echo” command just prints the string inside the quoutes. In example 2-3, we use comments in addition to “echo” command.
Example 1-2: example1-2.php
<html>
<head>
<title>Example 1-1, PHP Sample Program</title>
</head>
<body>
<?php
/*
Multiple line comment
*/
echo "Hello World! from PHP code!";
// single line comment
?>
</body>
</html>
After looking at the result in your browser, you can check the HTML code resulted from the PHP file by using “view page source” or “view source” command in your browser (in view or page menus).
<html>
<head>
<title>Example 1-1, PHP Sample Program</title>
</head>
<body>
Hello World! from PHP code!</body>
</html>
As you see, comments produce no output at all and the “echo” command is replaced by its output which is the string inside the quote.
Starting from next lesson we will learn about PHP commands and techniques used to build PHP pages and websites.
Exercises
1.How do browser and web server work with each other?
2.How does PHP work?
3.Visit XAMPP website and list the operating systems which are supported by XAMPP. What type of XAMPP installations is available in the website? What is the file name of the full download (.exe form) for the latest XAMPP version?
Next Lesson
|