Tables (2)
As we saw in previous lesson, tables are important in
web design because we need them for holding text, pictures, buttons, etc. in
their places in addition to creating normal tables. In this lesson we will
cover more options about table cells (cell padding, cell spacing …) and finally
we will learn how to link different parts of a single image to different web
addresses.
Cell Width (Column Width)
In previous lesson we learned
how we can determine width and height of a table.
<HTML>
<HEAD>
<TITLE>Table: Column widths not
specified</TITLE>
</HEAD>
<BODY>
<TABLE WIDTH=400 HEIGHT=100
BORDER=3>
<TR>
<TD>TOP LEFT</TD>
<TD>TOP RIGHT</TD>
</TR>
<TR>
<TD>BOTTOM LEFT</TD>
<TD>BOTTOM RIGHT</TD>
</TR>
</TABLE>
</BODY>
</HTML>
In above table we have not determined sizes for two
cells in first row. However you can determine width of each column in your
table by specifying width of cells in first row. Just be careful to specify
correct sizes. For example if your table width is 200 pixels sum of cell widths
in a row must be exactly 200 otherwise each browser will render the page
differently because of the wrong setting.
Example 6-1a: page6-1a.html
<HTML>
<HEAD>
<TITLE>Example 6-1a</TITLE>
</HEAD>
<BODY>
<TABLE WIDTH=400 HEIGHT=100
BORDER=3>
<TR>
<TD WIDTH=140>TOP LEFT</TD>
<TD WIDTH=260>TOP RIGHT</TD>
</TR>
<TR>
<TD>BOTTOM LEFT</TD>
<TD>BOTTOM RIGHT</TD>
</TR>
</TABLE>
</BODY>
</HTML>

Figure 6-1: First column 140 Pixels wide, second column 260 pixels wide
You can also determine cell
widths in percent. Sum of cell width percentages must be 100%.
Example 6-1b: page6-1b.html
<HTML>
<HEAD>
<TITLE>Example 6-1b</TITLE>
</HEAD>
<BODY>
<TABLE WIDTH=400 HEIGHT=100
BORDER=3>
<TR>
<TD WIDTH=35%>TOP LEFT</TD>
<TD WIDTH=65%>TOP RIGHT</TD>
</TR>
<TR>
<TD>BOTTOM LEFT</TD>
<TD>BOTTOM RIGHT</TD>
</TR>
</TABLE>
</BODY>
</HTML>
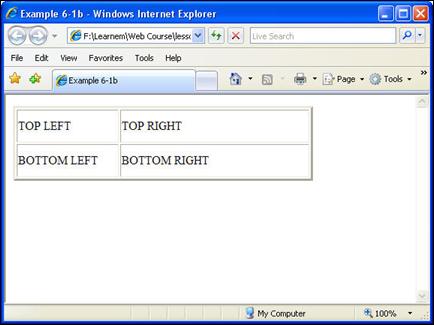
Figure 6-2: First column 35% wide, second column 65% wide
When you determine sizes of
first row cells you do not need to determine widths for second row cells etc.
If you want a cell to be empty, you cannot omit
definition for that cell or just leave its content empty. Insert cell
definition (using <TD> tag), and enter a between
<TD></TD> tags. As we told in earlier lessons this means a space
character. You must enter at least a single space in this form if you need an
empty cell, otherwise area of the cell will not appear like an empty cell.
Browsers will not render the cell correctly.
Example 6-2: page6-2.html
<HTML>
<HEAD>
<TITLE>Example 6-2</TITLE>
</HEAD>
<BODY>
<TABLE WIDTH=400 HEIGHT=100
BORDER=3>
<TR>
<TD WIDTH=140>TOP LEFT</TD>
<TD WIDTH=260> </TD>
</TR>
<TR>
<TD> </TD>
<TD>BOTTOM RIGHT</TD>
</TR>
</TABLE>
</BODY>
</HTML>
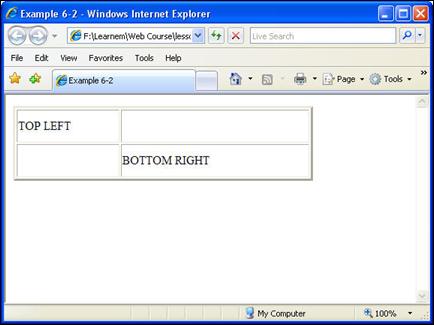
Figure 6-3: Empty cells
In above example we have two empty cells but because
we have specified both table size and column sizes, table will not lose its shape
and first column will be 140 pixels wide and the second column will be 260
pixels wide. If we remove sizes, we cannot guarantee how it will be displayed
on different browsers and screen modes. We urge you to determine table sizes in
every table you create. If you want your tables resize automatically to fit the
browser window, you need to use percent sizes but if you want fixed width
tables, use pixel sizes for your tables. Also if you want the size of a cell to
be exactly the same as a picture (which is put inside it) you need to use pixel
size.
Cell padding
You can specify two other
important size parameters for a table. Cell padding is the space between cell
borders and table contents such as text, image etc.
Example 6-3: page6-3.html
<HTML>
<HEAD>
<TITLE>Example 6-3</TITLE>
</HEAD>
<BODY>
Cell padding effect :
<BR><BR>
<TABLE BORDER=3 CELLPADDING=20>
<TR>
<TD>TOP LEFT</TD>
<TD>TOP RIGHT</TD>
</TR>
<TR>
<TD>BOTTOM LEFT</TD>
<TD>BOTTOM RIGHT</TD>
</TR>
</TABLE>
</BODY>
</HTML>
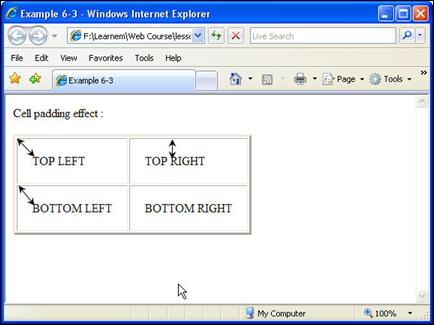
Figure 6-4: Cell Padding
Default value for this option is 1. It means the
contents of a cell will have a distance of one pixel with borders. If you don't
want any space between objects inside the cells and its borders you can
determine a value of 0 for this option. You can also increase the padding size.
In above example we have set a padding of 20 pixels to show you the effect. We
have added a few arrows to the picture to show the padding distance.
Cell spacing
Cell spacing parameter determines the space between
inner (cells) and outer parts (outer border) of a table. In fact a table is
constructed form two borders. A outer border area and a cell border area. There
is a space between cell area and outer border. We call this "cell
spacing". If you increase this value you will have a thick border. Default
value for this property is 2. If you specify 0 for it, you will have a very
thin border.
Example 6-4: page6-4.html
<HTML>
<HEAD>
<TITLE>Example 6-4</TITLE>
</HEAD>
<BODY>
Cell spacing effect :
<BR><BR>
<TABLE BORDER=3 CELLSPACING=20>
<TR>
<TD>TOP LEFT</TD>
<TD>TOP RIGHT</TD>
</TR>
<TR>
<TD>BOTTOM LEFT</TD>
<TD>BOTTOM RIGHT</TD>
</TR>
</TABLE>
</BODY>
</HTML>
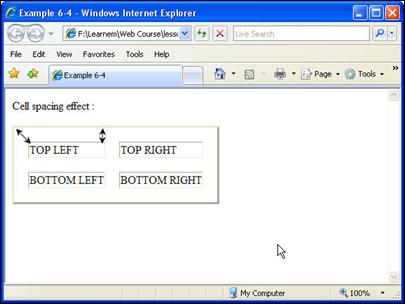
Figure 6-5: Cell Spacing
You can also mix cell spacing
and cell padding options to make specific tables you need.
Tables and images
Sometimes you need an image which each section of it
links to a different website address. When user clicks on different parts of the
picture they will be navigated to different pages. In previous lessons you
learned how to use an image as a link.
In this special case you can cut your picture into as
many parts as you need and insert them in a table that holds image parts beside
each other. Then link each image part to a different page. You will also need
to set both cell spacing and cell padding to a value of 0 to prevent the table from
appearing between image parts. In this way users will see a single image but
when they click on different parts of the image they will go to different addresses.
There is another method using
image maps to accomplish above purpose but we do not discuss it in this lesson.
Working with graphic editing programs
As a web designer you need a graphics editor program.
There are many professional programs available in the market.
Adobe Photoshop ™ is a very professional and powerful
program but it is expensive. If you are in graphics design job, then buying
this software is a good idea. Otherwise you can use free but powerful software
called “Paint.NET”. You can download
Paint.NET from its website at http://www.getpaint.net.
Graphics editor programs will enable you to cut pictures
into parts, add effects to your graphics, decrease graphics size etc. In exercises
of this lesson you need such software to cut a picture into 4 parts. As a web
designer you really need to have expertise in at least one graphics editor
software.
Exercises
1. In previous lesson we asked you to create a 2*2 table with images inside each cell that gather at the center of the table. As we did not know how to omit cell padding and cell spacing, image parts had a little space between them.
Rewrite that example in a way that picture parts stick to each other so that the user can not realize they are separate images. Cut a single image into four parts with your desired graphics editing program. Then use these 4 images for this exercise.
If you want to send your exercise to your tutor send pictures with it (preferably all of them in a zip file). Also mention which program you are using for editing images.
2. Rewrite above example so that each part of image links us to a different page in your website. Use <A HREF=""></A> inside <TD></TD> tags.
Next Lesson
|